martes, 17 de julio de 2018
Multiple PHP version with XAMPP on Windows
Sometime we fall into a situation whereby we badly need to test our project in another PHP version to check if it’s safe across all recent/commonly used PHP versions. Well, that situation came across my path. I wanted to test my project compatibility with the new version of PHP (7.1.8 as of the time of writing this post). I did my first routine by visiting Google.com in-search for an easy way out. Most of the article I came by are more focused on running multiple version of XAMPP on Windows e.t.c and not about having multiple PHP version with XAMPP on Windows. I couldn’t find a suitable post going my direction so, I decided to think and rethink. All I wanted was an easy way to switch between multiple versions of PHP; I don’t want any simultaneous process nor do I want to install another MySQL or Apache server and so on.
Well, follow these easy steps to allow multiple PHP version with XAMPP on Windows.
Currently, I have XAMPP with PHP 5.6.31 installed on my Windows 10 workstation and I want to install PHP 7 alongside this installed version. So, the first step I took was to download the portable version of XAMPP on Apachefriends.org. I thought having PHP version 7.0.22 & 7.1.8 will be cool though (I have my reasons and it’s obvious).
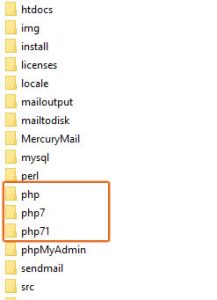
When the download it completed, extract each files to there respective folders. You only need the php content from the portable versions of XAMPP downloaded. Rename the php folder to php7 and php71 respectively. (or any name you prefer)
First of all, STOP your Apache and MySQL server. Now copy each renamed PHP folder to your current XAMPP directory. You should have something like this:

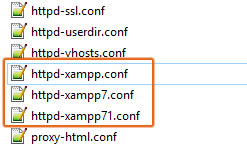
With this in place, you will, therefore, need to make some changes to your Apache config files. To start with, open [DRIVE:\]xampp\apache\conf\extra and locate the httpd-xampp.conf.
Replicate this file by using Ctrl+c and Ctrl+v; you will need to do this for both version of PHP. Now, rename the two new copies to httpd-xampp7.conf and httpd-xampp71.conf respectively.

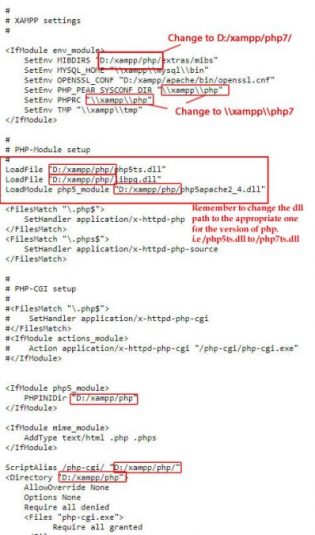
Open each file, that is “httpd-xampp7.conf” & “httpd-xampp71.conf”, and edit accordingly as depicted below.

Basically, all you need to do is change all the php path in each file, i.e D:/xampp/php/ to D:/xampp/php7/ and D:/xampp/php71/respectively. Remember to change the .dll path to the appropriate one for the version of php. i.e /php5ts.dll to /php7ts.dll. You need to be careful though.
Please note: You are not to change all php content you see to php7 or php71; change only the paths as shown in the picture above.
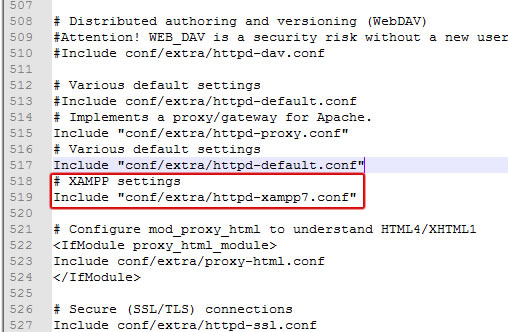
Almost there. Next step is; open [DRIVE:\]xampp\apache\conf\httpd.conf file and search for # XAMPP settings

All you have to do is edit “conf/extra/httpd-xampp.conf” to the version of php you want to use. Remember the XAMPP settings files are named according to the version of PHP we have in the XAMPP directory.
So, anytime you want to alternate the version of PHP, just stop your Apache server and edit [DRIVE:\]xampp\apache\conf\httpd.conf file by changing “conf/extra/httpd-xampp.conf” to “conf/extra/httpd-xampp7.conf” or “conf/extra/httpd-xampp71.conf”.
Furthermore, before you do any START and STOP on your server, you need to change some settings in you php.ini files as well. Open your \xampp\php7\php.ini and \xampp\php71\php.ini files and edit these settings.
Find (use Ctrl+f or Ctrl+h in your editor)
include_path=D:\xampp\php\PEAR and replace with(=>) include_path=D:\xampp\php7\PEAR
extension_dir=”D:\xampp\php\ext” => extension_dir=”D:\xampp\php7\ext”
error_log=”D:\xampp\php\logs\php_error_log” => error_log=”D:\xampp\php7\logs\php_error_log”
zend_extension = “D:\xampp\php\ext\php_xdebug-xxxx.dll” => zend_extension = “D:\xampp\php7\ext\php_xdebug-xxxx.dll”
[If using ZEND extension, please make sure you are using the right version of dll for the right php version to avoid problem]
Make sure you handle all php path correctly in each php.ini and httpd-xampp.conf files as well.
In conclusion, this is my method of using Multiple PHP version with XAMPP on Windows and this process seems so easy to me and I prefer it to the simultaneous server process. With this, you don’t need to use multiple port, Apache server or have another MySQL installation.
You can download all versions in this link:
https://sourceforge.net/projects/xampp/files/
Suscribirse a:
Enviar comentarios
(
Atom
)
Sígueme en las Redes Sociales
Donaciones
Datos personales
Entradas populares
-
En este apartado vamos a explicar como ejercutar archivos PHP a través del terminal de Ubuntu. Lo primero que tendríamos que hacer es inst...
-
En este blog voy a comentar un tema que se utilizan en casi todas las páginas web que existen, y es el tema de la paginación. La paginaci...
-
Este post trata de la integración de la librería PHPExcel en Codeigniter, aunque se podría aplicar a cualquier librería, como por ejemplo mP...
-
Ejemplo para añadir o sumar un número determinado de hora/s, minuto/s, segundo/s a una fecha en php. Con la función strtotime se puede ...
-
Este tema es uno de los temas primordiales sobre el framework Codeigniter, ya que en alguna ocación nos hemos visto obligados a recoger dato...
© Espacio Daycry - Espacio de programación 2013 . Powered by Bootstrap , Blogger templates and RWD Testing Tool


No hay comentarios :
Publicar un comentario